Lighting from all angles!
- ch3536
- Oct 28, 2021
- 2 min read
Updated: Dec 16, 2021
*UPDATED! Replaced Multiple Images* This week's assignment was all about seeing the light! I mean, not THAT LAST BIG LIGHT, but about lighting itself and how to properly manipulate it to get some great shots!

___________________________________________________________________________________________
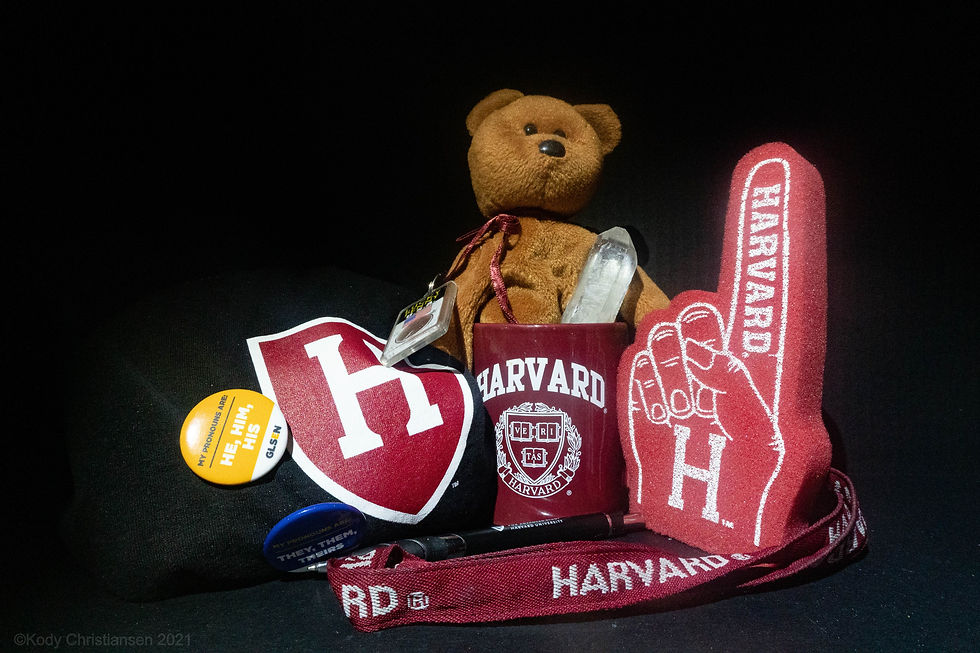
LOW KEY LIGHTING

ISO 200 | 16 mm | f 3.5 | 1/30 sec
___________________________________________________________________________________________
TOP LIGHTING

ISO 500 | 5.1 mm | f 1.6 | 1/45 sec
___________________________________________________________________________________________
SIDE LIGHTING

ISO 500 | 5.1 mm | f 1.6 | 1/45 sec
___________________________________________________________________________________________
TEXTURE LIGHTING

ISO 640 | 5.1 mm | f 1.6 | 1/40 sec
___________________________________________________________________________________________
BACKLIGHTING

ISO 1250 | 5.1 mm | f 1.6 | 1/2 sec
___________________________________________________________________________________________
LIGHT PAINTING

ISO 200 | 16 mm | f 3.5 | 15 sec
___________________________________________________________________________________________
CONCENTRATED LIGHT

ISO 640 | 16 mm | f 3.5 | 1/25 sec
___________________________________________________________________________________________
DIFFUSED LIGHT

ISO 800 | 5.1 mm | f 1.6 | 1/5 sec
___________________________________________________________________________________________
FRONT LIGHTING

ISO 500 | 5.1 mm | f 1.6 | 1/40 sec
___________________________________________________________________________________________
HIGH KEY LIGHTING

ISO 100 | 15.1 mm | f 1.6 | 1/120 sec
___________________________________________________________________________________________
REFLECTION: This assignment was one for the books - no wonder professional photographers have assistants or lighting rigs! Getting the lighting just right while maintaining the dexterity to push the shutter button was a bit of good exercise and stretching gymnastics - but it was all worth it. I was able to change my date and year to the correct time and followed the same metrics used by Leonie on her sample page to make sure mine would come out similar. I am still trying to figure some things out - this is a beginner class after all - but I can see improvements in my photography and in my understanding of the camera and that makes me happy.
**Update: This was not one of my most successful assignments, thanks to weird depth of field issues (low f stops mistakenly used), and lighting and backdrop issues. I also did not realize my camera had a 'bulb' function until my professor was able to sort it out with me. Time and monetary constraints made this assignment what it was : a piece of yellow tissue paper and a cardboard trifold from CVS are much more affordable than high quality photography equipment and fancy sheets.**
**UPDATE #2** With a new backdrop and a new subject (a ceramic dragon I made), I was able to pull off a bit more successful attempt! With lightroom and my temporary camera - I was able to capture some pretty stunning images of my little sculpture. I was really pleased to see how the light bounced off the porcelain and created a wave like design in front of it in some shots.


Comments